How to Change Toner on Brother Printer: A Step-by-Step Guide
Hey guys! Do you know how to change toner on Brother printer? People who are not tech-savvy might find it tricky, and they often
look for support or guidance. And I know this is the biggest problem among
printer users. Since nobody wants to damage their expensive printer, they rely
on a reliable guide.
In this blog, I am going to show you how to change a toner cartridge on a brother printer. Besides, I
have replaced many of the cartridges found in my shop. From there, I have years
of experience guiding you with accurate steps. With these steps, you will be
able to replace the toner easily. You don’t need to worry too much about this
thing, as I have already made it easy in this blog. So, let’s start diving into
this blog to learn further.
Things You Must Know
Before Replacing a Printer Toner

Before I tell you
how to change toner on Brother printer, I want you to remember the
following points:
Do you know toner doesn’t actually expire? Yes, you heard
that right! Whenever my Brother Printer sends the Replace Toner message on my printer, I keep printing via the Continue Mode. Also, I have noticed
that when I continue printing, the message changes from Toner Low to Toner Ended. Hence,
I would suggest you keep printing until you detect the misprint.
But you must order your toner as it will definitely
expire one day. So, until it reaches, you should set it up before replacing it.
Here are some general rules that you need to follow:
●
You should always
use real Brother toner for optimal printing.
●
Don’t unpack the brother
toner until you are ready to install it.
●
Before installation,
you must remove everything, including the wrapper, extra cushioning, and
others.
●
Also, some toner
will come with an orange-colored protective cover. Ensure to remove it just
before installation.
●
Last but not least,
you should shake the toner side to side before installing it.
How to Change Toner on
Brother Printer?
Now, let’s see how
to change a toner cartridge on a brother printer with step-by-step
instructions.
Step 1: Turn On Your
Brother Printer
The first thing I always ensure while installing the
cartridge is that I keep my printer turned on 10 minutes before installation.
After that, you should move ahead to open the printer. While opening it, be
careful as some parts of the printer might be hot.
Step 2: Open the Front
Cover and Pull Out the Drum Unit
Then, I press the Release
button to open the front cover. I use firm pressure when needed.
Once done, I grab the green handle and pull it out
horizontally. At the same time, I give a slight pull upwards to slide right
out.
Step 3: Remove the
Older Toner
Now, this is the time when I will remove my old toner.
For this, I use the green clips given on the left side, popping the toner out
from the drum unit.

While performing this step, you should not touch the drum
rollers. In addition, the light green or blue cylinder is the most sensitive
part, so be extra careful and do not touch it.
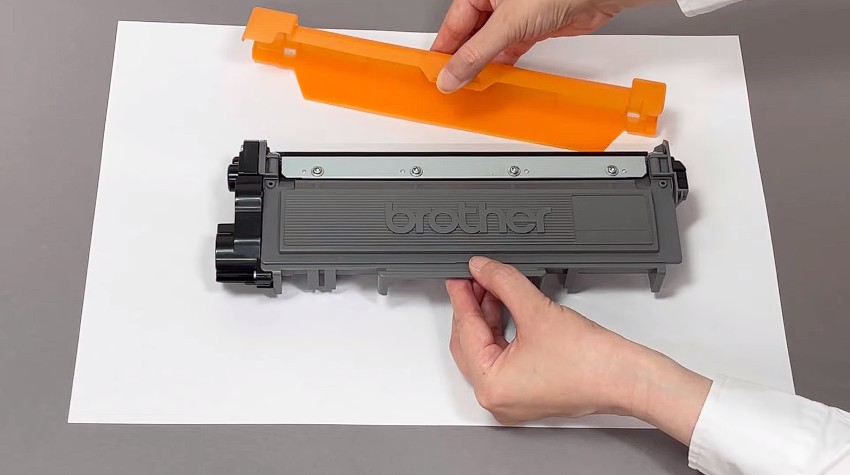
Step 4: Prepare Your
New Toner

Next, I have to remove the toner and all types of
packing, including this orange protective cover. Afterward, it’s time to shake
the cartridge horizontally in a gentle way. Now, I inserted it into my drum
unit, where my old toner was placed.

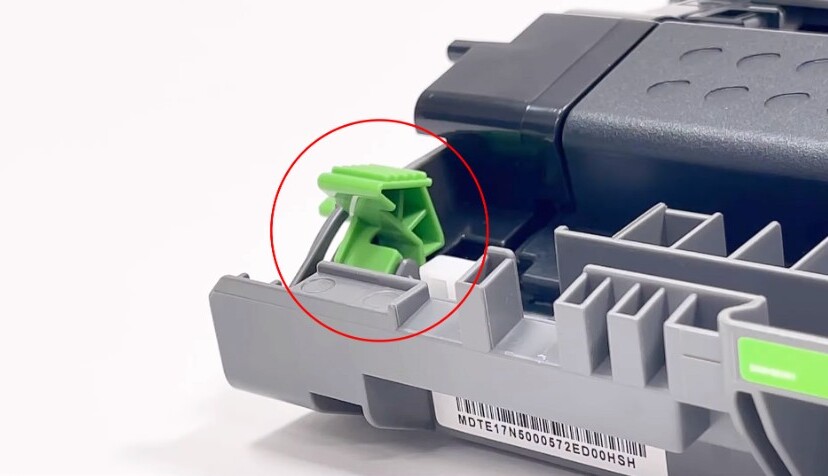
Step 5: Clean the
Corona Wire
Here, I will not put the drum unit back in, but before
that, I will clean the corona wire. To clean it, you will find a green tab with a straight groove next
to it. It is located on the top left side of your drum unit.
I first grab the green tab with my fingers and slide it
across the groove and back. This should be repeated three to five times. Then,
I returned the green tab to its place in the corner of the drum unit.
Step 6: Place the Drum
Unit
Finally, I push my drum unit back into its place using
the same green handle. Make sure you hear the click sound, which means your
entire unit is placed correctly.
Lastly, you need to close the front cover.
But WAIT! I am not done yet! There is one more thing you
should note: don’t turn off the printer right after installing the cartridge.
Let your printer self-diagnose the program. In simpler words, you need to keep
it on until it shows Ready Mode.
So far, you might have very well understood how to change toner on Brother printer
in 6 simple steps. I am certain that you will be able to change the toner
quickly and hassle-free.
FAQs
Question 1: How to
reset toner on Brother printer?
Answer: Follow the steps below to reset the toner on a brother
printer:
- First, you need to turn on the printer.
- Then, you have to open the Front Cover of the printer.
- Press and hold the Go button until all the LEDs are on the printer’s Control Panel flashes on.
- After that, release the Go button.
- Again, hit the Go
button twice.
- Now, you will need to press the Go button five times.
- Finally, close the front cover, and now your printer
is ready to print anything.
Question 2: How can I
refill my brother toner cartridge?
Answer: In order to refill the brother toner cartridge, you have
to follow the size of the cartridge:
- First, remove the screws from the side of the
cartridge.
- Then, uncover the side panel and then remove the
gear.
- After that, remove the inner felt and also take out
the fill cap.
- Next, you will need to clean out any spare toner and
refill the toner.
- Finally, replace the sealing plug.
Question 3: Why are
Brother printer toner cartridges expensive?
Answer: It might be because many printer brands, including
Brother, usually sell the printer at a loss. To overcome this loss, they sell
other accessories like cartridges at a higher rate to make a profit. In
addition, a standard toner cartridge can be used for 2000 to 3000 pages, while
an inkjet cartridge can only be used up to 200-300 pages.
Final Words
In this guide, I talked about how to change toner on Brother printer in 6 simple steps. With
this, I also mentioned some important points that everyone needs to check
before changing the cartridge into the brother printer. However, the important
point I would like to highlight here again is that you should never leave
anything, such as wrapper or paper, into your cartridge. In addition, you
should only remove the package when you are ready to install it.


Comments
Post a Comment